
STEP 1: Install Windows 11 on VirtualBox #
In this tutorial, I’ll be using VirtualBox by Oracle. VirtualBox is known as a Type 2 hypervisor, which allows us to run multiple virtual machines (VMs) on top of our existing operating system.
To install VirtualBox:
- Go to virtualbox.org and click on the Download tab.
- Choose the package for your particular host. I am installing on a Windows 11 host computer, so I click on Windows hosts.
Press enter or click to view image in full size

- Save to your computer and double-click the download to run the installer.

- Click Yes to the UAC if prompted for permission.
- Click through the installation: accept terms, choose location (I used the default), click Yes to proceed, customize setup, and click Install.
Press enter or click to view image in full size

- When installation is complete, click Finish to open up VirtualBox.
- You have now successfully installed VirtualBox! My screenshot shows a few VMs that I already have installed, however if this is your first time installing VirtualBox, your panel should be blank.
Press enter or click to view image in full size

STEP 2: Download Windows 11 ISO #
To install Windows 11 in VirtualBox, you’ll need a copy of the operating system in the form of an ISO file. An ISO file is a complete digital image of a physical installation disc — essentially, everything needed to install an operating system. It’s the format VirtualBox uses to boot up and install the OS on a virtual machine, just like inserting a DVD into a physical computer.
For this setup, we’ll be using the Windows 11 Enterprise Evaluation ISO, available for free from Microsoft’s Evaluation Center. This version is designed specifically for IT professionals and organizations who want to test Windows 11 Enterprise features in a lab or trial environment. It includes advanced tools and configurations not available in the Home or Pro editions. This version is only Valid for 90 days from the time you first install and activate it. After the 90-day period, the system may start warning you that Windows is not activated, and certain features may be limited or shut down. This is great for temporary lab environments, cybersecurity practice, or learning enterprise tools. I won’t tell you that you can reinstall or create a fresh VM if you want to reset the trial period — so feel free to do whatever you want with that information.
To download ISO:
- Go to https://www.microsoft.com/en-us/evalcenter. Click on the Windows tab and choose Windows 11 Enterprise.
Press enter or click to view image in full size

- Select Download the ISO — Window 11 Enterprise.
Press enter or click to view image in full size

- Fill out the registration for the free trial.
Press enter or click to view image in full size
![[Pasted image 20251229101913.png]]
- After clicking Download now, choose your version. I selected the English US version.
Press enter or click to view image in full size

- I saved mine to my Downloads folder. This is a 5GB file, so expect the download to take a little time. Once it’s done, you’re ready to create your Windows 11 VM.

STEP 3: Create your Windows VM in VirtualBox #
- Open VirtualBox and click Machine > New.
Press enter or click to view image in full size

- Name your VM (e.g., Windows 11 (64-bit)). Specify the folder that will store the VM’s files. Choose the downloaded Windows ISO as the installation image. Check Skip Unattended Installation.
![[Pasted image 20251229102023.png]]
- Set up Hardware (recommend at least 8GB and 4 CPUs).
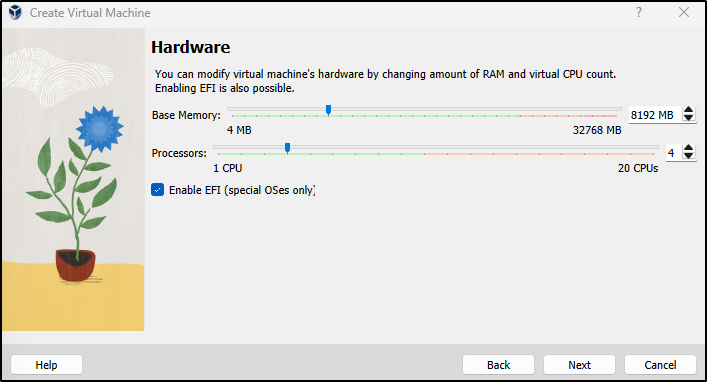
- Keep Virtual Hard disk at the default 80 GB.

- Review Summary and click Finish.
![[Pasted image 20251229102106.png]] - The VM should now appear on the left of the VirtualBox Manager. Select it and and click Start from the top panel. You can also start it up by right-clicking on the machine and clicking Start.
Press enter or click to view image in full size

Windows Setup: #
- Follow installation prompts to complete setup. The VM will reboot a few times — this is normal.

- When prompted to create a Microsoft user account, click Sign-in options.

- Select Domain join instead.

- Enter a name to use for the local account.
![[Pasted image 20251229102154.png]] - Create a password and fill in the security questions.

- Choose privacy settings (I unchecked all of them).

- Once the installation finishes and the VM reboots, log in with the username and password you created in step 10.
Press enter or click to view image in full size
![[Pasted image 20251229102229.png]]
STEP 4: Finalize Windows 11 VM Setup #
Now that your Windows VM is up and running, it’s time to install Guest Additions — a package of drivers and utilities provided by VirtualBox that improve the performance and usability of your VM.
Key Benefits of Installing Guest Additions: #
- Seamless Mouse Integration: Move mouse freely between the VM and host.
- Improved Display Options: Enables full-screen mode, automatic screen resizing, and better resolutions.
- Shared Clipboard: Copy and paste text between your VM and host machine (this is my personal favorite!)
- Shared Folders: Easily transfer files between host and VM.
- Better Performance: Optimized video, mouse, and storage drivers improve responsivesness.
To install Guest Additions: #
- In the Windows VM, select Devices from the top menu and choose Insert Guest Additions from the drop down menu.
- Open File Explorer inside the VM and locate the CD Drive for the VirtualBox Guest Additions.
Press enter or click to view image in full size

- Click and find VBoxWindowsAdditions-amd64.
Press enter or click to view image in full size

- Right-click and Run as administrator. Click Yes to the installation.
Press enter or click to view image in full size

- Click Next to Start the installation of Guest Additions.

- Choose defaults options. When the installation finishes, click Finish to reboot the VM.

- After logging back in:
- Go to View > Auto-resize Guest Display to enable dynamic resolution. This tells the VM to automatically adjust it’s screen resolution to match the size of the VirtualBox window. This is great for presentations and screenshots. It also feels much more natural and responsive compared to a static display.
Press enter or click to view image in full size

- Enable Clipboard sharing: Devices > Shared Clipboard > Bidirectional. Or you can also do this from the VirtualBox Manager in Settings > General > Advanced > Bidirectional. Optionally, enable Drag ’n’ Drop > Bidirectional for file transfers.
Press enter or click to view image in full size
![[Pasted image 20251229102400.png]]
STEP 5: Create a VM Snapshot #
A snapshot is like a save point for your virtual machine. It captures the exact state of your VM at a specific moment — including the operating system, installed programs, settings, and files — so you can return to that exact moment if something goes wrong.
Now that you have a fresh installation with Guest Additions, this is a great time to take a snapshot.
To take snapshot: #
- Go to Machine > Take Snapshot from the VM’s top menu. Give your snapshot a clear name and click Ok.
Press enter or click to view image in full size

- You’ll see the snapshot loading on the right.

- You can now return to this exact state at anytime by selecting the snapshot and clicking Restore.
Press enter or click to view image in full size

Conclusion #
By following this guide, you’ve successfully created and configured a Windows 11 virtual machine using VirtualBox — from installing the hypervisor, to downloading the ISO, completing the OS installation, enhancing it with Guest Additions, and finally taking a clean snapshot.
This setup is a solid foundation for lab environments, cybersecurity practice, software testing, or just learning Windows in a safe, contained space. With features like shared clipboard, drag-and-drop, and screen resizing all enabled, your VM should feel responsive and easy to use — almost like working with a regular app on your host machine.